
728x90

14강까지는 타워를 선택하고 U 키로 업그레이드를 처리했습니다.
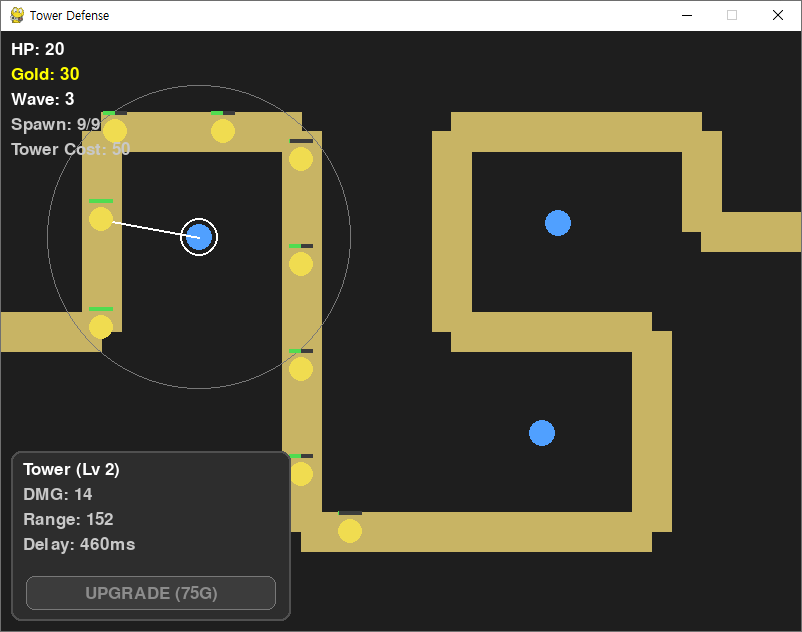
이번 15강에서는 선택된 타워 정보를 화면에 표시하고, 버튼 클릭으로 업그레이드할 수 있도록 UI를 추가합니다.
패널 위치는 왼쪽 하단입니다.
1. 패널 영역과 버튼 준비
왼쪽 하단에 패널을 고정 배치하고, 패널 하단에 업그레이드 버튼을 준비합니다.
PANEL_W, PANEL_H = 280, 170
panel_x = 10
panel_y = SCREEN_HEIGHT - PANEL_H - 10

upgrade_btn = pygame.Rect(panel_x + 15, panel_y + PANEL_H - 45, PANEL_W - 30, 34)
2. 클릭 처리 순서 구성
버튼이 추가되었기 때문에 클릭 처리 순서를 분리합니다.
- 버튼 클릭
- 타워 선택
- 타워 설치
if event.type == pygame.MOUSEBUTTONDOWN and event.button == 1:
    click_pos = pygame.mouse.get_pos()

    # 1) 업그레이드 버튼
    if upgrade_btn.collidepoint(click_pos):
        if 0 <= selected_tower_index < len(towers):
            t = towers[selected_tower_index]
            cost = t.get_upgrade_cost()
            if gold >= cost:
                gold -= cost
                t.upgrade()
        continue

    # 2) 타워 선택
    clicked_any = False
    for i in range(len(towers) - 1, -1, -1):
        if towers[i].is_clicked(click_pos):
            selected_tower_index = i
            clicked_any = True
            break

    # 3) 타워 설치
    if not clicked_any:
        if not is_on_path(click_pos, path_points) and not is_overlapping_tower(click_pos, towers):
            if gold >= TOWER_COST:
                towers.append(Tower(click_pos))
                gold -= TOWER_COST
                selected_tower_index = len(towers) - 1
3. 패널 출력과 선택 정보 표시
렌더링 단계에서 왼쪽 하단 패널을 그리고,
타워가 선택되면 정보를 출력합니다. 선택이 없으면 안내 문구를 출력합니다.
pygame.draw.rect(screen, (45, 45, 45), (panel_x, panel_y, PANEL_W, PANEL_H), border_radius=10)
pygame.draw.rect(screen, (80, 80, 80), (panel_x, panel_y, PANEL_W, PANEL_H), 2, border_radius=10)

if 0 <= selected_tower_index < len(towers):
    t = towers[selected_tower_index]

    screen.blit(font.render(f"Tower (Lv {t.level})", True, (255, 255, 255)), (panel_x + 12, panel_y + 10))
    screen.blit(font.render(f"DMG: {t.damage}", True, (200, 200, 200)), (panel_x + 12, panel_y + 35))
    screen.blit(font.render(f"Range: {t.range}", True, (200, 200, 200)), (panel_x + 12, panel_y + 60))
    screen.blit(font.render(f"Delay: {t.fire_delay}ms", True, (200, 200, 200)), (panel_x + 12, panel_y + 85))

    # 버튼(마우스 올리면 테두리 강조)
    hover = upgrade_btn.collidepoint(mouse_pos)
    pygame.draw.rect(screen, (60, 60, 60), upgrade_btn, border_radius=8)
    pygame.draw.rect(
        screen,
        (255, 255, 255) if hover else (120, 120, 120),
        upgrade_btn,
        2 if hover else 1,
        border_radius=8
    )

    cost = t.get_upgrade_cost()
    txt_color = (255, 255, 0) if gold >= cost else (140, 140, 140)
    text_surf = font.render(f"UPGRADE ({cost}G)", True, txt_color)
    screen.blit(
        text_surf,
        (upgrade_btn.centerx - text_surf.get_width() // 2,
         upgrade_btn.centery - text_surf.get_height() // 2)
    )
else:
    screen.blit(font.render("Select a tower", True, (180, 180, 180)), (panel_x + 12, panel_y + 10))

    pygame.draw.rect(screen, (60, 60, 60), upgrade_btn, border_radius=8)
    pygame.draw.rect(screen, (120, 120, 120), upgrade_btn, 1, border_radius=8)
    text_surf = font.render("UPGRADE", True, (140, 140, 140))
    screen.blit(
        text_surf,
        (upgrade_btn.centerx - text_surf.get_width() // 2,
         upgrade_btn.centery - text_surf.get_height() // 2)
    )
4. 실행 결과
728x90
'⚙️ Python > 🎮 Pygame 실전' 카테고리의 다른 글
| [Pygame] 🏰 2D 타워 디펜스 게임 만들기 17강 | 스프라이트 적용 (0) | 2026.02.17 |
|---|---|
| [Pygame] 🏰 2D 타워 디펜스 게임 만들기 16강 | 타워 판매 기능 추가 (0) | 2026.02.16 |
| [Pygame] 🏰 2D 타워 디펜스 게임 만들기 14강 | 타워 강화 시스템 만들기 (0) | 2026.02.14 |
| [Pygame] 🏰 2D 타워 디펜스 게임 만들기 13강 | 적 종류 추가하기 (0) | 2026.02.13 |
| [Pygame] 🏰 2D 타워 디펜스 게임 만들기 12강 | 웨이브 시스템 만들기 (0) | 2026.02.12 |